Saturday, August 29, 2015

Crochet Fun

Hello Dearies.
Do you crochet? Knit? Maybe have no interest and prefer to buy your stuff at the store? Haha, it’s ok. I used to buy everything premade too. Sometimes I still do :) Even though it isn’t getting cold yet, now is the perfect time to start your winter knit and crochet projects. If you’re like me and have almost NO time to sit and focus, starting early is best. My goal is to have everything I want to make for my family done by the end of September right on time for the chill. I have 2 places I love to look for yarn inspiration. One is of course pinterest. The other is ravelry. You can find both paid and free patterns and some amazing, amazing ideas! I can’t show what I’m currently working on since it’s a present for a friend that claims they read all of my posts. Haha. But I wanna show a little bit of the fun stuff you can do once you learn to crochet.
First off, for those of you wanting to learn. Hit up Youtube! Like Now! There are some amazing tutorials on there. My grandma first tried to teach me to crochet and knit back when I was in college. I forget everything she said in a couple months. When I later decided I wanted to get back into it I went to Youtube and learned everything I know. I cannot say enough good things about they women that make video tutorials. They rock! I make all sorts of item but my favorites are hats. Lookie!
  009021 040386565_2508015024988_1391449294_32165827_1861807714_n_medium August 29, 2012 (4)August 29, 2012 (43) August 29, 2012 (45)November 17, 2012 (10) November 17, 2012 (18)October 4, 2013 (1) October 26, 2012 (4)October 26, 2012 (31) 005October 4, 2013 (5)
 Some of these hats were designed by me, some by other people. You can find all of these hat patterns through my project page on Ravelry. As always, I’d love to see your projects! Please share a link in the comments below or tag me on instagram @images_by_jessie or on twitter @imagesbyjessie

Saturday, August 22, 2015

Stamped Photos

Hello Dearies!
This is a project I’ve been wanting to do ever since I first saw it online but I can’t find where that was originally. If you know, please tell me so I can give credit for this super fun idea. Searching for photos for this project was hard and has taught me a lot. First off, I don’t take photos they way I thought I did. My husband and I need to take more photos together. The one I choose was from 2013. 2013!!! We’ve taken a few selfies since then but I wanted something posed. I can’t believe it’s been so long. Also it turns out, I never take photos of just my daughter. I thought I did. I am constantly sneaking photos of my older son because I thought I had no good photos of him. Turns out I have hundreds of him and only a handful of her. I have a lot of photos of her posing with other people but almost none by herself. I guess it’s not so bad but I really wanted solo shots for this project.
Ok Ladies and Gents, This project is quick, easy and has the potential to be messy. What fun! :)
20150819_073441
What you’ll need: *2 copies of a black and white photo. Size is totally up to you. I printed these myself with normal printer paper. I’ve also done this with photo paper and it works well but the stamp ink takes FOREVER to dry on the glossy photo paper so you have to be very very careful not to smudge them. Photos with simple backgrounds work the best. As you can tell the photos of my kids have simple backgrounds and turned out really well. The photo of my husband and I looks a bit messy. We may have to get someone to take a new photo for us. Ha! *Scissors *Ink pad in whatever color you would like. Black ink works too but I think color is much more fun and really pops with this project. *Rubber stamps. I used fun pattern stamps for this but you could also do something fun with words. Start by picking your stamp and ink. You want to plan out where you will stamp ahead of time. I am only stamping the backgrounds in my photos so the people in them will stay black and white. You can do a fun rainbow of colors but to keep it simple, I am just using one ink color for each photo. Even though the photos are in black and white I used the original colors of the photos to inspire me in picking my ink pads. For example, my son’s shirt was red so I used red ink in his photo. The original background of my daughter’s photo was a lush green park scene so I used green ink. You can pick out your ink however you would like. One of your photos will be stamped on and the other will be used as a template to protect the areas you don’t want stamped. Take one photo and cut away all of the background so all you have left is the subject of your photo. Line it up perfectly (or as good as you can) with the uncut photo.  Hold it into place and start stamping. Remove the cut out piece after you are done stamping the photo and you’ll see your subject sticks out beautifully.
20150819_074239
20150819_074750
20150819_07431620150819_075203
20150819_075224
20150819_07595320150819_080716
20150819_08070020150819_080723
20150819_08224320150819_082253
20150819_083304
20150819_083318
We are not in the new house yet but this is the idea I’m going for when I finally get them framed and hung up. I will post photos when we get it done :)
20150819_083929
I hope I explained everything alright. Feel free to ask me any questions at all and as always, I’d love to see your projects! Please share a link in the comments below or tag me on instagram @images_by_jessie or on twitter @imagesbyjessie

Saturday, August 15, 2015

Duck Tape Photo Frames

Hello Dearies!
 Do we have any decorative tape fans here? I’m a sucker for it. Why tape needs to be pretty, I have no idea but you can find the coolest designs now days. The two I'm using today have Popcorn and Mac and Cheese on them! How awesome is that? :) I am guilty of buying much tape but then using very little. I just don’t always know what to do with it. It’s one of those things I’m a litte bit afraid to do because I’m afraid of messing it up and wasting the awesome tape I have. People are so creative with what they can do. After searching for hours on pinterest for ideas with both the little stuff (washi tape) and the big stuff (duck tape) I decided to decorate a frame.
All you need for this project is: *a Photo Frame *Some Super Pretty Tape *A Pair of Scissors (you may not use the scissors but I did to trim up some edges) When I wrote this post it had photos but then they disappeared and I cannot for the life of me get them to re-load. So for the moment I am going to share some links to some similar projects I found on pinterest to help inspire your frames… I hope to get the photos working and update the post when I can. https://www.pinterest.com/pin/151503974942110552/ https://www.pinterest.com/pin/97179304432033644/ https://www.pinterest.com/pin/222083825349766248/
 This was another fun and cheap project. I found my frames at a Good Will store for a dollar a piece and I got my tape for around 3 dollars at Walmart. I had tons of tape left over as well which made me happy. I get to use these fun patterns again!!! The only problem is that the frames now make me hungry. Haha! So this is pretty self explanatory. It was a little time consuming making sure that the tape was smooth and lined up properly but overall very easy. And fun. My daughter is upset that I did these without her so I’m going to find some frames so she can do her own :) Thanks for reading. I hope to get my photos fixed soon.
I’d love to hear what you think. If you do something similar or absolutely any other fun projects you’d like to share with me, please share a link in the comments below or tag me on instagram @images_by_jessie or on twitter @imagesbyjessie

Saturday, August 8, 2015

Dream Tub

Hello Dearies! First off, I just noticed that I forgot to post last week. I am so sorry. Life has been crazy. I bought a new house for my family. And by new house I mean 95 year old house that needs to be fixed up in almost every way. Haha! I do love it though. I get to pick how I want things to look. I’m learning how to do things I thought I’d have to hire people for. It really is rewarding to do the work yourself. It’s also very frustrating because it seems like a never ending battle. Like every time I get something done, I have to add 10 more things to my to do list. So far all the projects we’ve done have been pretty big and not really the sort of fun DIY stuff I wanna show here. We painted every single wall. We installed insulation. We tiled the bathroom and installed the cabinets, counter and sink. We sanded and re-stained several of the floors. We have original hard wood floors! It’s amazing!!! We ripped up one completely horrible floor and rebuilt it. Today we started putting in the kitchen cabinets and counters. Once they are done, we’ll lay the kitchen tile, then hook up all the plumbing and finish the electrical and about a bajillion other things. Who knows when we’ll ever get finished. Haha. But enough of the shop talk.
Today I want to share with you something really fun I got to do this week. I painted my tub! IMG_6496
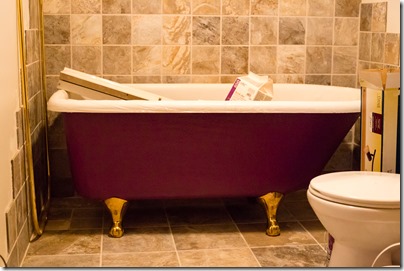
It’s amazing! It is my favorite thing about the new house so far. I just wanna sit in my bathroom all day :) I keep joking that I’m going to keep this bathroom all for myself and make everyone else use the boring one in the basement. Haha! My mom taught me how to do the tile. It was so fun and so easy and it looks so good! I’m glad I learned how to do it myself.
  IMG_6504
After we put the bathroom together, I thought it was missing something and for some crazy reason a little voice in my head yelled out “paint the tub!” I’ve seen fancy tile around tubs before but I’ve never seen a painted tub. I’m really not sure if it’s something people do. But I did it and I love it so so so much! I took these photos at night with bad indoor lighting. The tub is much much prettier when the sun light bursts through the window. It’s not quite so red. Also we aren’t quite done with everything yet so you’ll notice the inside of the tub is filled will stuff we haven’t used yet but don't need sitting out on the floor :)
  IMG_6508IMG_6510
 Look at that pretty tile! Isn’t awesome? Also you can see that I didn’t get the bottom of the tub painted but let’s ignore that and focus on the tile. Haha! So this isn’t really a tutorial, just a fun thing you can do to (if you have a tub like this) Ok so this tub looks like the old fashioned bear claw tubs but it’s actually a newer version. It’s a bit smaller and because it’s more cheaply made, it doesn’t have a smooth ceramic underside. The bottom of the tub is ruff and textured. This made it super easy to paint and I think that texture will help the paint stay on for a long time. I used normal wall paint. It was left over from my daughter’s room. Since the tub isn’t hooked up yet, I pulled it out on top of a bunch of newspaper so I could paint all sides. I did 2 coats to make sure none of the white textured part showed through. Then I wiped of any splatters that landed on the feet. At first I wanted to paint the feet but I’m glad I didn’t. I like how shiny they are :)
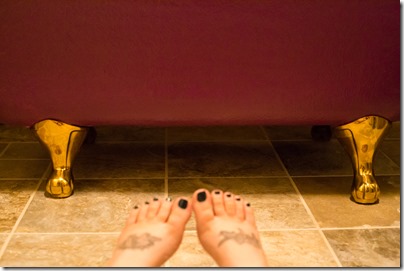
  IMG_6514
Anyways, thanks for reading. I’d love to hear what you think. If you do something similar or absolutely any other fun projects you’d like to share with me, please share a link in the comments below or tag me on instagram @images_by_jessie or on twitter @imagesbyjessie

Saturday, July 25, 2015

Nature Walks

I’m a big fan of nature-y projects like this so I was doing them for my friends birthday but this is absolutely a great project for the kiddos too. It’s a woodsy tic tac toe game! After I made mine (the green one) My daughter made the red one. It looks like it’s glowing in the photos but it really isn’t that vibrant. I’m not sure why my camera hated that color. We went out on a walk around the lake to get our supplies and used some paint and glue I already had lying around at home. Super easy!
  20150722_083407
What you will need:
*Large wood piece. My dad cut these with a saw out of a log for us but my friend insists that you can find similar pieces at craft stores. *Sand paper. I only used sandpaper because my dad cut these raw for me. If you buy your piece from a craft store, it’ll probably be pre-sanded. *Small sticks. You will need 2 long sticks and six short ones (I picked up 2 long ones and cut them to my needs) *Garden Sheers (for cutting the sticks or you can just break them to the lengths you want) *Paint and a paint brush *Glue *Small rocks How To: My dad used a rotary saw to cut 2 two inch slices out of a log. I left the edges nice and raw but I sanded the front and back so it was smoother but not too smooth. I still wanted a very rustic look. I painted just the front side with normal acrylic paint. After the paint was dry, I scrapped off a little paint with a piece of sand paper to make it look more worn. I cut two long sticks and glued them about 2 inches apart from each other on the wood. I then cut 6 smaller sticks and made two lines across the 2 larger sticks to make what is basically a hashtag symbol for all you young ones out their. Haha. For the X’s and O’s, we painted little rocks. For the red game, the X’s were orange painted rocks and the O’s were Yellow. For the Green game, I found smoother rocks and used my paint markers to paint little X’s and O’s on each stone. These were a lot of fun to make and also very fun to play.
  20150722_08334020150722_083344
 If you make your own, please share with me a link in the comments below or tag me on instagram @images_by_jessie or on twitter @imagesbyjessie

Saturday, July 18, 2015

Pinterest Addict

Hello Dearies! I must confess, I'm not writing this today. At this very moment, I am at my lovely grandma's home stuffing my face with whatever amazing goodies she has baked for the family. Since I won't be around this week to do any projects, I wanted to share where I get some of my inspiration. Pinterest. It's amazing! If you haven't tried it yet, I suggest you don't because it will take over your entire life and you'll be so obsessed with pinning your next project, that you'll have no time to do your last one... Haha! I joke of course... but I'm also telling the truth. You cannot help but get caught up in it. I currently have 40 "boards" and just under 3,000 "pins" You can pin everything from artwork to food to jewelry to makeup tutorials and household cleaning tips. My favorite subject to pin is of course Halloween but I also pin all sorts of fun day to day crafty goodness. If you'd like to follow me, all my boards can be found at https://www.pinterest.com/sillysaska/ and if you are new to pinterest and would like some ideas of what to search for first, my cousins and I are doing a big project this week. Our grandma wanted to go on a boat tour and we thought it be fantastic if we all looked like match-y nerds so we are making almost 50 tie dyed t-shirts :) We did some pretty simple tie dye but you can look up some amazing ideas on pinterest... Look, I did already.... push HERE :) :)
Ok so now a little favor to ask of you all. I LOVE crazy patterned duck tape but I still have yet to decide on a way to use it. Look at these two pieces of awesome! One is mac and cheese, the other is movie popcorn. What should I do with them? Let me know? Duck Tape Also, if you tie dye anything, please share with me a link in the comments below or tag me on instagram @images_by_jessie or on twitter @imagesbyjessie

Saturday, July 11, 2015

Painted Mug

Hello Dearies! I wrote this post Sunday after getting hit with some “Jawsome” inspiration. Haha! Ok I will admit, that was horrible. :) :) :)
  20150531_110748

 I bought this plain black mug and these paint markers weeks ago but I couldn’t decide what to do until Shark Week started! Do you guys watch? I cannot get enough of it. I am completely landlocked in the middle of North America so I am totally fascinated by all things ocean. And sharks are just so cool.
So today’s craft really isn’t a tutorial because you can do paint whatever you like but I wanted to talk a bit about the process.

  20150705_203417

I used black, gold and silver paint markers and a 99 cent mug from the dollar store (I love when things are super affordable!) The paint markers are pretty awesome. They were easy to use and dried nice and smooth. I waited until the first color was dry before I moved onto the next one to avoid smearing. These dry really fast so I didn’t have to wait long. I used a medium tip marker for this project and I think I’ll buy the fine tipped markers next time so I can do some better details. I am not the best artist but I am very happy with my new mug.
  20150705_202655
20150705_202707

So what do you think? If you paint your own mug, I’d love to see them.
Please leave a link to your projects in the comments below or tag me on instagram @images_by_jessie or twitter @imagesbyjessie